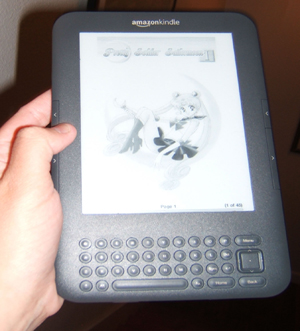
With its amazingly long battery life, easy-to-carry size, and unique ability of being readable even in direct sunlight, the Amazon Kindle is a great device to read the Sailor Moon manga on!

What You Will Need:
– A Kindle (I use the Kindle 3)
(Note: Per Amazon, only the Kindle and the Kindle DX are PDF-compatible. Thus this will not work for Kindle reading apps like Kindle for PC or Kindle for iPhone. Sorry!)
– A Kindle USB cord OR a wi-fi connection (for Amazon Whispernet)
– A computer (to send the files from)
Directions:
-Download your desired manga PDF release.
-Follow the instructions below for getting the PDF on your Kindle.
-Turn on your Kindle’s wireless and sync your Kindle (if using Whispernet).
-Enjoy!
If You Are Using a USB Cord
The Kindle, like all similar devices, comes with a USB cord to use for charging the battery. However, this cord can also be used to connect your Kindle to your computer so you can transfer files to it – which, if you have a lot of manga files you’re sending over at once is actually not a bad idea. (It’s actually faster than the other method, which I’ll explain in a minute). To transfer your PDF manga releases to your Kindle via the USB cord, do the following:
1. Plug in your Kindle with the USB cord. A “USB Drive Mode” screen will appear on your Kindle screen, and your computer will recognize it as a USB device/drive.
2. Find the directory where you saved your PDFs.
3. Select the files you want to send.
4. Expand the Kindle drive to show the “documents” folder. This is where you want to send your PDFs to. (They won’t show up in your list of stuff on the device otherwise).
5. Move the files to this folder using whatever method you prefer (drag-and-drop, copy-and-paste, etc).
6. Congrats! Your files are now on your Kindle. Disconnect your Kindle from the computer and enjoy!
If You Are Using Amazon Whispernet
Say you don’t have your USB cord handy. No problem! Amazon has a totally awesome service called Amazon Whispernet, which wirelessly syncs all things Kindle – it even syncs your Kindle apps like Kindle for PC or Kindle for iPhone to your Kindle device! Pretty handy, huh? Using it to send PDFs takes a bit more work than the USB cord method, but it is still rather useful. Here’s what you do:
1. Log in to your Manage Your Kindle page on Amazon (assuming you registered your Kindle with Amazon when you got it, which I recommend)
2. Make sure you have some e-mail address authorized to work with your Kindle. You will need this. If you don’t, go to “Your Kindle Approved E-mail List” (on the Manage Your Kindle page) and add one.
3. Figure out your Kindle’s “device e-mail” (the e-mail you will send the documents to). You can find this out in two ways: setting it up on the Manage Your Kindle page or by going to page 2 in the Settings area of your Kindle device and looking under “Device E-Mail.”
4. Once you have this set up, log in to whatever e-mail you authorized for your Kindle account and open the “compose new e-mail” mode.
5. For the address, you have two options. The regular option is [name]@kindle.com. However, you will be charged money if you use that option (you can set a limit for how much you get charged on the Manage Your Kindle page, though). I suggest using the free option, which is [name]@free.kindle.com. (I don’t know why they even have a paid option, actually).
6. Now attach the PDF to your e-mail, keeping in mind that larger files will take longer to download on your Kindle (and also your e-mail client may have size limits for attachments).
7. Once it’s attached, don’t add anything to the subject line or content box. The only time you want to put something in the subject line is if you want to convert the PDF to Kindle format, which lets you use functions like Text-to-Speech, variable font size, annotations, etc. In that case, you put “Convert” in the subject line. Generally, though, I haven’t liked the results I’ve had doing that, so I don’t recommend it. (Their Text-to-Speech function is experimental right now anyway, and it sounds like that awful Microsoft Sam voice).
8. Send the e-mail.
Then, as I mentioned above in the directions, turn on the wireless on your Kindle (Menu Button -> Turn Wireless On) and connect to the wi-fi (or 3G, if you have a 3G Kindle). After a few moments, it should connect (a box may pop up asking you to select a network, and if it’s one where you have to log in to the network, like the wi-fi at my school, you will be directed to the Kindle’s web browser to do so). Then sync it (Menu Button -> Sync and Check for Items). It will sync (a message in the top bar will show this) and then start downloading the files. You can check on them if you want (Menu Button -> View Downloading Items), but it’s not necessary. As they finish downloading, the synced files will show up on the Home screen.
Once they’re downloaded, just select them (using the arrow pad) and start reading!
Omake: Making a Collection of Your Files
So you’re enjoying reading Miss Dream’s releases on your Kindle. But maybe you’ve decided you want to have them all in a nice, neat category by themselves, away from your other Kindle reads? No problem. The Kindle makes it quite easy to do so via its ability to make “collections.” Here’s what you do:
1. Find the manga PDF files on your Kindle (they’ll say “pdf” next to the names, which should help you find them).
2. Select a file with the arrow pad keys, and then press the right-hand arrow key. This will open a document-specific menu.
3. Find the option in this menu that says “Add to collection” and select it.
4. A new screen will pop up, allowing you to add the document to an existing collection or to create a new one. Either select an existing collection to add the file to, or scroll down to “Create New Collection.”
5. If creating a new collection, a box will pop up asking you to name the collection. Use the letter keys on the Kindle for this. If you want symbols or numbers, press the SYM key to bring up the menu for those.
6. Once you’re finished typing the name, use the arrow keys to select the “save” button and click on it.
7. The collection will then be created, and your file will automatically be added to it.
You can also create the collection first and then add files to it. To do so, find the option for creating a collection in the Main Menu (Menu Button -> Create New Collection) and name it as directed above. Then follow the instructions above to add the files to the collection you created.
(Guide written by Misty of Myu Corner)